How to Make a Software Tutorial Video: Record or Draw?
How to make a software tutorial video: when to screen-record, when a drawn explainer teaches better, how to combine them, and a tutorial outline to copy.
Record the screen when the viewer needs to copy clicks. Explain with a drawn video when they need to understand what the feature does, why it works that way, or what happens behind the screen. Most good software tutorials use both: a short concept video first, then a screen recording of the exact steps.
The mistake most teams make is using one format for everything. A seven-minute screen recording that tries to teach the idea, the setup and every option at once is hard to follow and goes out of date with the next interface change. Below: how to choose, a structure that works for any software tutorial video, recording tips, and a worked example you can adapt.
Screen recording or drawn explainer: how to choose
Ask what the viewer will do straight after watching.
| The viewer needs to... | Use | Why |
|---|---|---|
| Click through a task: set up, configure, export | Screen recording | They match what they see to their own screen |
| Understand a concept: permissions, sync, versions, billing cycles | Drawn explainer | The idea is not visible on any one screen |
| Follow a workflow across several tools or teams | Drawn explainer | A screen recording would jump between apps and lose the thread |
| Decide between options: which plan, which setting | Drawn explainer, then a short recording | The choice needs a reason; the setting needs a click |
| Fix a specific error | Screen recording | Exact messages and exact buttons matter |
| Learn a feature that is still being built, or changes often | Drawn explainer | It does not depend on the current layout |
The last row matters more than people expect. A screen recording is out of date the day a button moves. A drawn explanation of "how roles and permissions work" survives redesigns because it shows the idea, not the pixels.
A structure that works for any software tutorial
Whatever the format, the same order works:
- The result first. Show what the viewer will have at the end: the finished report, the automated email, the connected calendar. Five to ten seconds.
- Who it is for and what they need. "You need admin access and an existing customer list." One sentence saves a lot of support tickets.
- The idea, briefly. What the feature does, in one or two sentences, before any clicking.
- The steps. One action per step, in order, with the reason when it is not obvious.
- Check it worked. What the viewer should see if they did it right.
- The common mistake. The one thing support hears about most, and how to avoid it.
- What next. The related task or video.
In a combined tutorial, parts 1 to 3 and 6 are often the drawn part. Parts 4 and 5 are the screen recording.
How to make the screen recording part
You do not need special software to start. macOS has screen recording in the Screenshot toolbar (Shift-Command-5), and the Snipping Tool in Windows 11 can record the screen. Dedicated tools add zooming, cursor highlights and easier editing.
What makes the difference is preparation:
- Use a demo account with clean, fake data. No real customer names, emails or invoices on screen. Turn off notifications and close other tabs.
- Make it readable. Record at 1920 x 1080 and zoom the app or browser to 125-150% so text is legible on a laptop. Small text is the most common complaint about tutorials.
- Script the voice, not just the clicks. Write what you will say for each step and read it aloud once before recording. Say button names exactly as they appear.
- Move the mouse slowly and pause after each click. Viewers need a second to find where you clicked.
- Record in short pieces. One take per step is easier to redo than one take for the whole task.
- Keep it short. Two to four minutes per task. If it runs longer, it is probably two tasks.
How to make the explainer part
The concept part is where software tutorials usually fail, because the person making them knows the product too well. Write it for someone who has never seen the feature.

- Start from the user's problem, not the feature name: "You send the same invoice to the same client every month" before "Recurring invoices".
- Use one concrete example all the way through. One client, one amount, one date.
- Draw the parts and how they connect. A template, a schedule, the invoices it creates. Arrows show what produces what.
- Name the terms the interface uses, so the viewer recognises them when they open the app.
You can draw this yourself on a whiteboard and film it, build it as slides, or generate it with an AI whiteboard tool from a short script. Our comparison of whiteboard videos and slides covers the trade-offs.
Worked example: recurring invoices in an invoicing app
Say your invoicing app has a recurring-invoices feature, and support keeps getting the same two questions: "why did my client get an invoice with the old price?" and "why didn't the invoice go out on the 1st?"
Both come from not understanding the idea: a recurring invoice is a template plus a schedule, and each invoice it sends is a copy of the template at that moment. That is a concept problem, so the tutorial gets two parts.
Part 1: drawn explainer, about 90 seconds
- The problem. A designer bills the same client the same amount on the 1st of every month and keeps forgetting.
- The idea. A recurring invoice is a template and a schedule. Picture: one template card, a calendar, three invoices coming out of it.
- Each invoice is a copy. On each date, the app copies the template and sends that copy. Invoices already sent do not change.
- The common mistake. Changing the price on last month's invoice. The fix is to edit the template, so the next copy uses the new price.
- Start dates. The first invoice goes out on the start date you choose, then repeats from there. If the start date is in the past, check what the app does before saving.
- Recap. Template plus schedule; edit the template, not a sent invoice.
Part 2: screen recording, about 2 minutes
- Open a client and choose to create a recurring invoice.
- Add the line items and price to the template.
- Set the schedule: monthly, on the 1st, starting next month.
- Save, then show where the upcoming invoices appear.
- Show how to edit the template when the price changes.
- Check: the next scheduled invoice shows the new price.
Prompt to copy for the drawn part:
Make a 90-second whiteboard explainer for small-business users of an invoicing app. Explain that a recurring invoice is a template plus a schedule, and each invoice sent is a copy of the template on that date. Use one example: a designer billing one client the same amount on the 1st of every month. Show the common mistake (editing an invoice that was already sent instead of the template) and the fix. Plain words, friendly tone, end with a one-line recap.
Put the two videos on the same help page, concept first. Most viewers who watch the first need far less of the second.
Making the explainer part with KolaVid
KolaVid makes the drawn half of a tutorial; it does not record your screen. It turns a typed prompt, pasted text or script, a PDF, Word, PowerPoint or text file, or a web link into a narrated whiteboard video, and each drawing appears as the narrator says it, one idea a board.
Paste the prompt above or your own script, or attach the feature's spec or help article with Add a document. Then choose the Hand-drawn style, the length, a voice and the narration language. Lengths are 1, 2, 3 or 5 minutes; free videos go up to 2, paid plans up to 5.
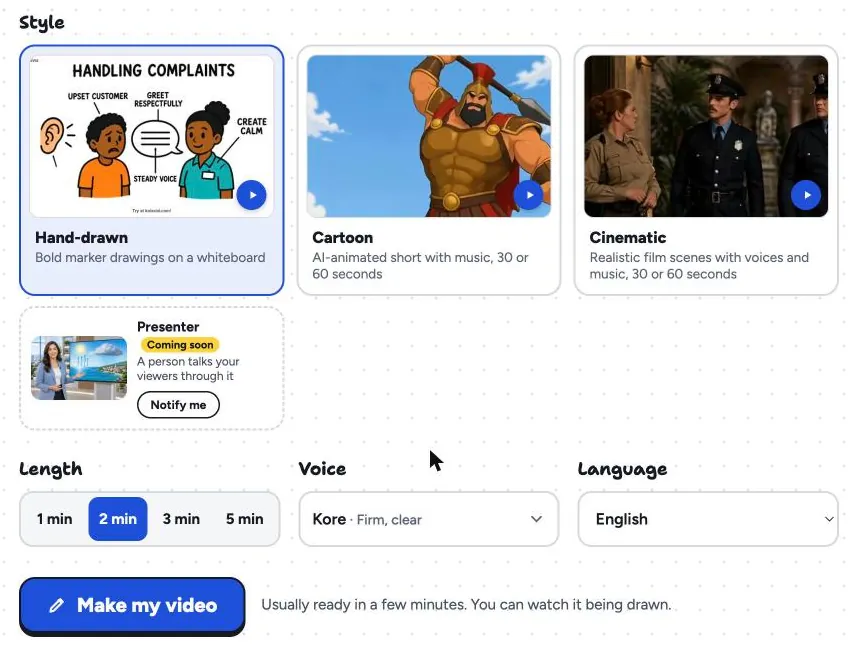
The video is usually ready in a few minutes. Pick Wide 16:9 for a help centre or product tour, or Square 1:1 for an in-app panel or social post. There is no editing timeline, so if a step changes, edit the script and make it again, which for a 90-second concept video is quicker than re-recording. Download the MP4 and place it above your screen recording, or share a link.
For explaining the technical ideas behind a product, see our guide on how to explain an API. For a feature launch rather than a how-to, the startup product demo guide covers the pitch side, and the training page has sample videos.
FAQ
How long should a software tutorial video be?
Two to four minutes per task for a screen recording, and 60 to 90 seconds for a concept explainer. If a tutorial runs past five minutes, split it by task so people can find the part they need.
What do I need to make a software tutorial?
A computer, a quiet room and a reasonable microphone. The built-in recorders in macOS and Windows 11 are enough to start, and a demo account with fake data keeps private information off screen.
Should I show my face in a software tutorial?
It is optional. For step-by-step tasks, viewers mostly watch the screen, and a face in the corner can cover controls. A friendly voice and a clear script matter more.
How do I keep software tutorials up to date?
Keep the concept and the clicks in separate videos. When the interface changes, re-record only the short screen recording; the drawn concept video usually still holds. Our guide to employee onboarding videos covers keeping a series current.
Pick one feature that causes tickets
Look at your support queue and find the feature people misunderstand most. Write the one-sentence idea behind it, make the 90-second concept video, and put it above your existing screen recording. A free KolaVid account includes enough credits for one 2-minute video, no card needed, which is enough to test whether the tickets drop.