How to Storyboard an Explainer Video (With Template)
How to storyboard an explainer video in five steps: a copyable template table, a worked one-minute storyboard, and how a storyboard helps AI video tools.
Most explainer videos that go wrong were already wrong on paper: a step missing in the middle, two ideas squeezed into one scene, an ending that just stops. To storyboard an explainer video, split the explanation into scenes of one idea each, then fill in a row per scene with the words the narrator says, the one picture on screen, the few words written on the board, and roughly how many seconds it takes. That table is the storyboard, and it catches those problems while they are still lines on a page.
You do not need to draw well. A stick figure or a short description of the picture is enough.
Below is a five-step method, a template you can copy, a complete worked storyboard for a one-minute video, and how a storyboard helps when an AI tool is making the video.
What a storyboard is for
A storyboard is a plan of the video, scene by scene, that you can read in a minute. For explainers it does three jobs:
- It tests the explanation. If you cannot fill in the picture column for a scene, the narration is usually too abstract. If a scene needs four pictures, it holds two ideas.
- It fixes the order. You see the whole path at once and can spot a missing step or a repeated one.
- It sets the length. Words per scene add up to a running time, so you know whether the plan fits in one minute or needs three.
Film and animation storyboards often show camera angles and shot types. An explainer storyboard can be simpler, because most explainers, and whiteboard videos in particular, show one board per idea with a voice over it.
A five-step storyboard method
Step 1: Write the one-sentence goal
"After watching, the viewer can..." Everything in the storyboard has to serve this sentence. Write it at the top of the page so you see it while you plan.
Step 2: List the beats
A beat is one idea the viewer has to take in before the next one makes sense. Write them as short phrases, in order. Most short explainers have four to eight beats:
- The question or problem the viewer recognises
- The parts or players involved
- What happens, step by step (often two to four beats)
- The common mistake or surprising part
- The recap
Each beat becomes one scene. If you have more than eight beats for a two-minute video, you are explaining two things. Split it.
Step 3: Write the narration for each scene
Write what the narrator says, as spoken sentences. Keep each scene to one to three sentences. Use one example all the way through instead of a new one per scene; the viewer then only has to learn the example once.
Step 4: Decide the picture and the board words
For each scene, describe one main picture and what it is doing. A bicycle moving, a hand squeezing a lever, two coins side by side. Then choose the words written on the board: two to four short labels, and only words the narrator actually says in that scene. If the board says "friction" and the voice says "rubbing", the viewer has to translate.
Step 5: Time it
Count the narration words in each scene. At roughly 130 to 150 words a minute, 20 words is about 8 to 9 seconds. Add the scene times. If the total is far over your target length, cut a beat rather than cramming the narration.
A storyboard template to copy
| # | Beat | Narration (what's said) | Picture (what's drawn) | Board words | Seconds |
|---|---|---|---|---|---|
| 1 | The question | ||||
| 2 | The parts | ||||
| 3 | Step 1 | ||||
| 4 | Step 2 | ||||
| 5 | The mistake | ||||
| 6 | Recap |
Put the goal sentence above the table, and the total seconds at the bottom. A spreadsheet works well because the word count and seconds can be calculated for you: seconds is roughly the word count divided by 2.3.
A worked storyboard: how bicycle brakes work
Goal: after watching, the viewer can explain how squeezing a brake lever stops a bicycle. Audience: 12 to 14-year-olds in a science lesson on forces. Length: one minute. Example used throughout: one cyclist on a red bicycle with rim brakes.
| # | Beat | Narration | Picture | Board words | Sec |
|---|---|---|---|---|---|
| 1 | The question | "A moving bicycle has a lot of energy. So how does a small squeeze of your fingers bring it to a complete stop?" | A cyclist riding along | complete stop, moving bicycle | 10 |
| 2 | The lever | "It starts at the handlebar. When you squeeze the brake lever, it pulls a thin steel cable." | A hand squeezing a lever, a cable running from it | brake lever, cable | 7 |
| 3 | The pads | "The cable pulls two rubber brake pads inwards, until they press hard against the wheel's rim." | Close-up of the wheel with two pads closing on the rim | brake pads, rim | 7 |
| 4 | Friction | "Now the pads rub against the spinning rim. That rubbing is friction, and it pushes against the wheel's movement." | Pads on the rim with small arrows against the spin | friction | 8 |
| 5 | Where the energy goes | "The bicycle's energy doesn't vanish. Friction turns it into heat, which is why brake pads get warm after a long hill." | The pads with small heat lines, a hill behind | heat, long hill | 9 |
| 6 | The mistake | "Squeezing only the front brake very hard can stop the front wheel too quickly. Use both brakes, gently and early." | Two hands on two levers, a tick beside them | both brakes, early | 9 |
| 7 | Recap | "Lever pulls cable. Cable pulls pads. Pads rub the rim. Friction turns movement into heat, and the bicycle stops." | The four parts in a row with arrows between them | lever, cable, pads, heat | 8 |
Total: about 135 words and 58 seconds, which fits a one-minute video.
A few things to notice. Every board word is something the narrator says in that row. Each scene has one picture doing one thing. Scene 5 answers the question a curious student would ask next ("where does the energy go?"). Scene 6 is the practical mistake, which makes the video useful outside the classroom. And the recap repeats the chain in the same words as the scenes, so it sounds familiar rather than new.
How a storyboard helps AI video tools
AI video generators make the scene plan for you. That saves time, but the tool can only plan from what you give it. A storyboard, even a rough one, helps in three ways.
It turns into a better input. Paste the narration column, in order, as your script. The tool then follows your scene order, your example and your words instead of inventing its own. If your tool takes notes on visuals, keep the picture column too. Our guide on turning notes into an explainer video shows how a rough outline works as input as well.
It gives you a checklist for the result. Watch the generated video with the storyboard beside you. Is every beat there? Are they in order? Does any scene show two ideas at once? This is much faster than judging a video on feel.
It tells you what to change. When something is off, you know whether the problem is in the plan (a missing beat, a weak example) or in the generation. Fix the plan and generate again, instead of retrying the same prompt and hoping.
If you prefer to start from a short prompt rather than a full storyboard, the beats list from Step 2 is often enough. Our prompt writing guide shows how to turn it into a prompt.
From storyboard to video in KolaVid
KolaVid builds whiteboard videos the way this storyboard is laid out: one idea a board, with each drawing appearing as the narrator says it. To use the worked example, paste the seven narration lines as your script, choose the Wide 16:9 frame for a classroom screen, the 1-minute length, a female or male voice and the narration language, and make the video. It is usually ready in a few minutes, and you can watch it being drawn.
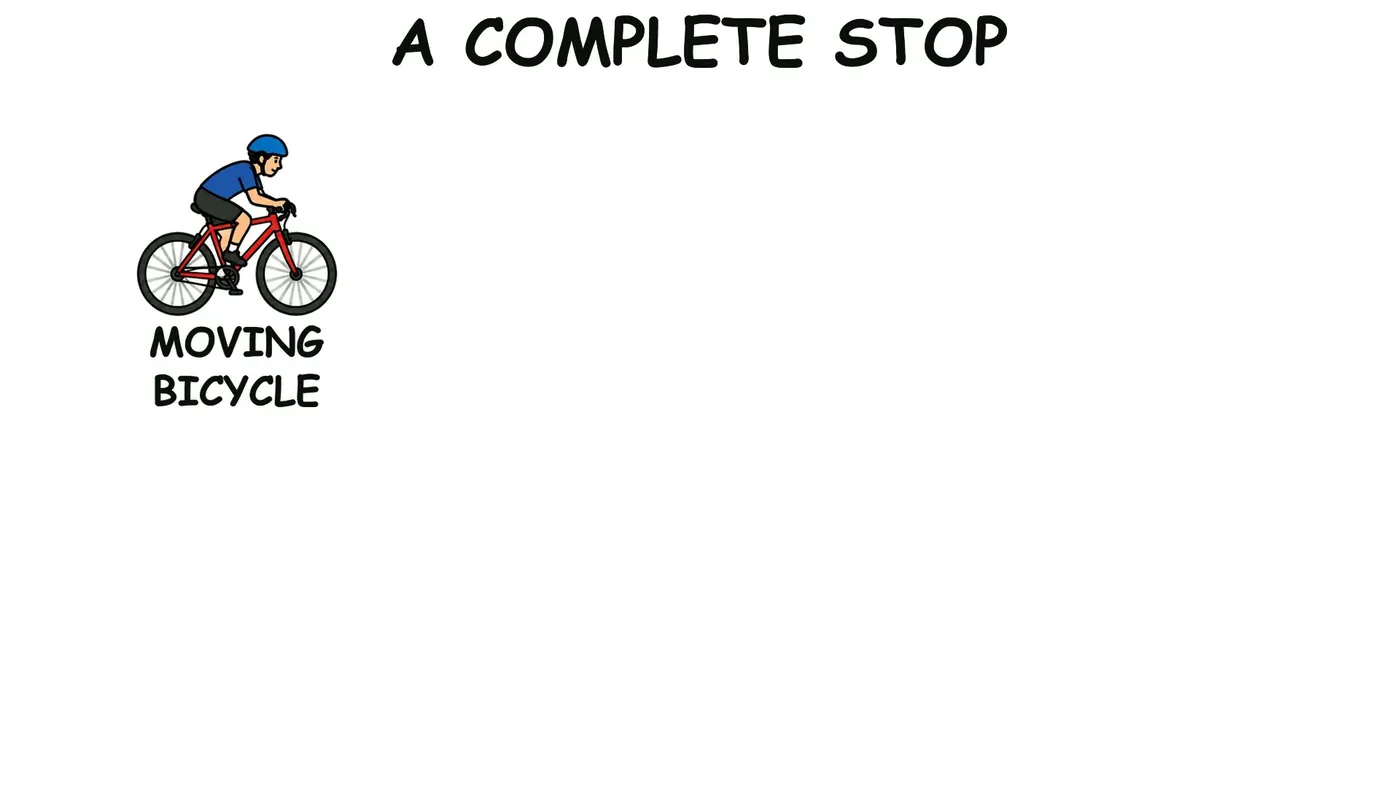
The frame above is from a sample video on bicycle brakes, caught just after the first drawing appeared: the board title and the moving bicycle, with the rest of the board still to come as the narration continues. That matches scene 1 of the storyboard.
Check the finished video against your table. If a scene is missing or a step is out of order, change the script and generate again; there is no editing timeline inside the video. Free videos go up to 2 minutes, and paid plans up to 5. The whiteboard page has more samples, and our guide to science concepts as whiteboard videos has more subjects that storyboard well.
FAQ
Do I need to draw to make a storyboard?
No. For an explainer, a written description of each picture ("a hand squeezing a brake lever") works as well as a sketch. Stick figures are fine if you think better in pictures.
How many scenes should a two-minute explainer have?
Usually eight to twelve. At 130 to 150 words a minute, a two-minute script is 260 to 300 words, and most scenes need 20 to 35 words. If you have far more scenes, they are probably too short to follow; far fewer, and each one is doing too much.
What is the difference between a script and a storyboard?
A script is the words the narrator says. A storyboard puts those words into scenes and adds what is shown and written in each one. For a whiteboard explainer, the storyboard is the script with a picture column.
Is a storyboard worth it for a one-minute video?
Yes, and it takes about fifteen minutes. A short video has no room for a wasted scene, so planning matters more, not less.
Plan one video this week
Pick a topic you explain often, write the goal sentence, list the beats and fill in the template. Reading the finished table aloud tells you more about the video than any first draft. If you want to see the plan turned into a video, a free KolaVid account includes enough credits for one 2-minute video, with no card needed.